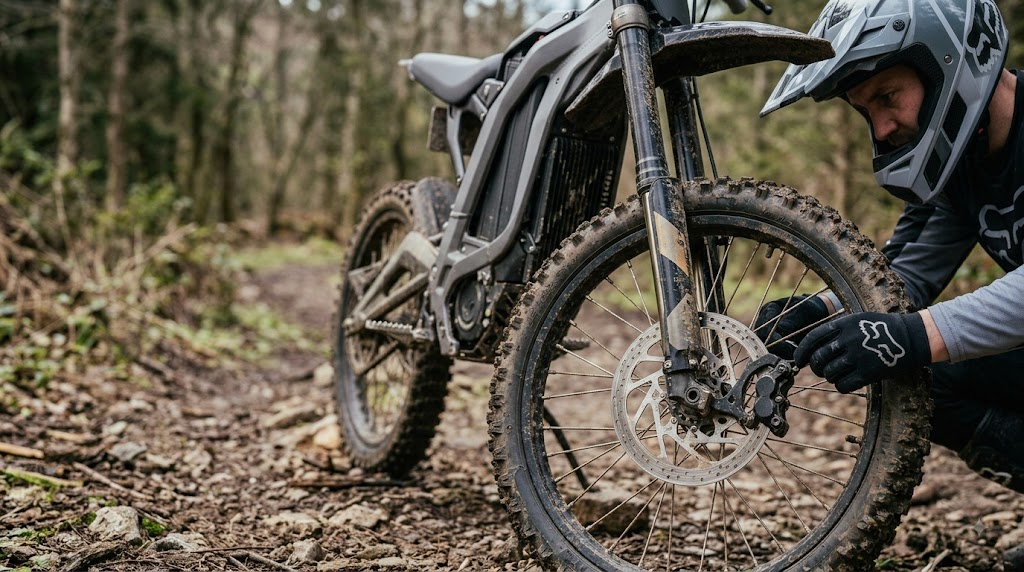
Electric Dirt Bike Brake Squeal: Causes and Safe Fixes
Electric dirt bike brake squeal is a diagnosis, not a single fault. The same noise can mean water on the rotor, which needs nothing, or oil-soaked pads, which need replacing. Sorting one from the other is the whole job.
The rule that keeps riders safe: judge the brake by how it stops, not how it sounds. A quiet brake is not automatically good, and a noisy one is not automatically failing.
Diagnose the Sound Before Cleaning Anything

Match your symptom below, then read the section it points to. Every cause is possible rather than confirmed until you inspect.
|
Symptom |
Possible cause |
First check |
Ride? |
|
Squeal only after rain or washing |
Moisture or fine dirt on the rotor |
Whether noise clears as the brake dries and braking stays normal |
Usually yes, if braking is unchanged |
|
Persistent high-pitched squeal |
Contamination, glazing, incomplete bed-in, pad or rotor surface problems |
Rotor and pad surfaces for oil film, shine or debris |
Cautiously, and inspect before the next ride |
|
Squeal plus weak braking |
Contamination, worn pads, a hydraulic issue, poor pad or rotor condition |
Braking performance first, then pad and rotor condition |
No. Treat as a safety issue |
|
Grinding or metallic scraping |
Severely worn pads, backing-plate contact, rotor damage, trapped debris |
Pad thickness and rotor surface |
No. Stop and inspect |
|
Squeal plus rotor rub |
Caliper alignment, an improperly seated wheel, a bent rotor, loose hardware |
Wheel seating, then rotor position in the caliper |
No, until the rub is identified |
|
Squeal plus severe vibration |
Rotor problem, uneven pad deposits, contamination, mounting or alignment issue |
Rotor face for scoring, warping and uneven deposits |
No, until inspected |
|
Squeal plus fluid leakage |
A hydraulic system fault |
Lever, hose and caliper for any trace of fluid |
No. Safety critical |
How Disc-Brake Squeal Starts

Squeal is vibration. When pad and rotor interact unevenly, the surfaces can oscillate at an audible frequency, and anything that changes the friction between them can start it.
Things that change that friction: water and grit between the surfaces, contamination soaking into the pad, a hardened glazed pad face, pad material that has not transferred evenly onto the rotor, a caliper not square to the rotor, or worn and damaged components. No single universal cause, which is why cleaning fixes some cases and does nothing for others.
7 Common Causes of Brake Squeal

1. Water, mud and trail dirt
Water or fine trail dirt can temporarily change friction at the rotor. SRAM support guidance recommends cleaning a previously quiet rotor with isopropyl alcohol or mild soap and water when noise begins, provided that method is compatible with the brake system.
A brief squeal after rain, a puddle, washing or a muddy section can be temporary if braking power and lever feel remain normal and the sound fades as the surfaces dry. Persistent noise, weak braking or abnormal lever feel needs inspection for contamination, incomplete bed-in or another fault.
2. Oil, grease, chain lube or brake-fluid contamination

Contamination can be easy to miss, and cleaning may not be enough once fluid has soaked into pad material. Possible sources include chain-lubricant overspray, suspension oil, grease, hydraulic brake fluid, greasy fingers, and cleaning or polishing products. Park Tool identifies aerosol overspray and hydraulic leaks as common routes.
Useful contamination signs include squeal, increased lever effort and a dark residue on the rotor or pads that smears when rubbed, as described in Park Tool’s pad guidance. Treat those signs as evidence to inspect further, not as a stand-alone diagnosis.
SRAM separately warns that oil from your hands alone is enough to contaminate a braking surface.
|
The contaminated pad rule Do not assume cleaning restores a contaminated pad. An undamaged rotor may be cleanable using a method approved for the brake system, but friction material that has absorbed oil or brake fluid often cannot be recovered. Park Tool documents a case where a set of pads contaminated with oil could not be returned to normal function by any product. SRAM support guidance goes further for persistent contamination noise and states the solution is to replace the pads and rotors, then carefully follow the bed-in procedure. On an adult electric off-road motorcycle, replacement is the safer call when pads are significantly contaminated, cracked, overheated or worn. |
What not to use on braking surfaces: WD-40, chain lubricant, silicone spray, polish, oily degreasers or household lubricants. Nothing that leaves a residue.
3. Glazed brake pads

Glazing describes a hardened, smoothed pad friction surface that can develop after excessive heat or poor friction conditions. Possible symptoms are squealing, reduced bite, inconsistent braking and a shiny pad face.
Contributors: repeated hard braking, prolonged braking on a descent, dragging the brake, incomplete bedding, general overheating.
Two cautions. Not every shiny pad is glazed, so do not diagnose on appearance alone. And this article will not give you a sanding grit or tell you to abrade the pad face, because that depends on what your brake manufacturer permits. Where pads are contaminated, cracked, overheated or substantially worn, replacement is safer.
4. Incomplete or improper bed-in
New pads and rotors need conditioning before they perform or run quietly. SRAM bed-in guidance explains that the point of bed-in is to increase friction between pads and rotors by distributing pad material evenly onto the rotor, and that new pads and rotors must be bedded in before they reach full braking potential.
Skip it, or do it unevenly, and you get noise, inconsistent braking, patchy transfer and weaker initial performance. SRAM also states bed-in must be repeated whenever new pads or rotors go on.
|
Whose procedure to follow SRAM publishes its bed-in procedure in its own brake manual, for its own components. This article does not reproduce it, because a procedure written for one brake system is not a specification for another. Use the bed-in procedure supplied with your brake system, or the applicable Valtinsu manual. No Valtinsu-specific brake bed-in procedure is confirmed in the publicly available product information, so if your manual does not contain one, contact Valtinsu support or the brake-component manufacturer rather than borrowing a figure from elsewhere. |
5. Caliper misalignment and rotor rub

If the noise repeats as the wheel turns rather than only when you pull the lever, that is rub, not squeal.
The rotor should pass through the caliper without continuous abnormal contact. Park Tool alignment guidance treats pad and rotor rub as a key symptom of hydraulic caliper misalignment, and notes that a wheel which is not properly seated can produce the same appearance of misalignment.
Possible causes: caliper alignment, an improperly seated wheel, a bent rotor, loose mounting hardware, or a pad clearance problem.
Safe inspection, bike switched off and securely supported: confirm the wheel is fully seated, look down through the caliper to see whether the rotor runs centrally, spin the wheel and watch for continuous contact, and check for visible rotor damage.
Where this article stops: no caliper bolt torque figures and no realignment sequence. Those need the manufacturer procedure for your brake. Without it, this is a technician job.
6. Worn brake pads

Pads are consumable. Inspect for insufficient friction material, uneven wear, cracking, crumbling, contamination, backing-plate contact and any visible damage.
On thickness, be sceptical of any article handing you a number. Limits are set per brake system, and Park Tool directs riders to manufacturer-specific wear specifications rather than a generic figure. Replace at your manufacturer minimum, not at a number you read somewhere.
Grinding is the exception to measured judgment. Metal-on-metal means the friction material is likely gone and the backing plate is on the rotor. Stop riding.
7. Damaged, warped or heavily worn rotor
Symptoms can include rubbing, vibration, pulsation, uneven braking, squealing and visible scoring.
Inspect for deep grooves, cracks, severe discoloration, visible warping, uneven wear, corrosion, and thickness below the manufacturer specification. No universal minimum exists, so that figure comes from the component manufacturer. Do not resurface or machine a rotor unless the manufacturer allows it, and remember that uneven pad deposits can make a true rotor feel warped.
Safe Fixes: Start With the Lowest-Risk Check

Work simplest first, and stop wherever the answer becomes replacement or professional inspection. Cleaning resolves temporary or surface contamination. It does not fix soaked pads, incorrect bed-in, alignment problems or worn components.
- Check braking performance before anything else. If stopping power has changed significantly, stop riding rather than chasing the noise.
- If the squeal appeared after rain, washing or mud and braking is normal, let the brakes dry. Controlled braking in a safe location can help clear moisture. Do not deliberately overheat the brakes.
- Inspect the rotor for contamination, scoring, warping, unusual discoloration and trapped debris.
- Inspect the pads for thickness, contamination, glazing, uneven wear, cracks and damage.
- Clean the rotor using a method approved for your brake system. SRAM recommends isopropyl alcohol, or mild soap and water, with a clean lint-free cloth. Avoid touching the braking surface afterward.
- Check caliper alignment and wheel seating visually. Only adjust if you have the correct manufacturer procedure. Otherwise, a technician.
- Replace contaminated or damaged pads rather than trying to save them.
- Bed in new pads or rotors following the manufacturer procedure for your brake system.
When Brake Noise Means Stop Riding
The table that matters most. Noise level tells you little. The symptoms accompanying it tell you a great deal.
|
Symptom |
Risk level |
Keep riding? |
Next step |
|
Brief squeal after rain or washing, braking normal |
Low |
Usually yes, with attention |
Let brakes dry; inspect if noise persists |
|
Persistent squeal, braking normal |
Moderate |
Cautiously |
Inspect rotor and pads; clean or replace as needed |
|
Squeal with reduced braking power |
High |
No |
Inspect pads, rotor and system before riding |
|
Grinding or metal-on-metal |
High |
No |
Stop. Inspect pad thickness and rotor damage |
|
Continuous rub with noise each revolution |
Moderate to high |
No, until identified |
Check wheel seating, rotor and caliper alignment |
|
Severe vibration under braking |
High |
No |
Inspect rotor face and mounting before riding |
|
Lever feels abnormal or travels unusually far |
High |
No |
Do not ride. Have the system inspected |
|
Any hydraulic fluid visible |
Critical |
No |
Stop immediately. Professional inspection |
What Not to Do
|
Avoid all of these
|
Brake Pad Compound: A Note, Not a Fix
Compound affects noise, but changing it is not a squeal remedy. Park Tool notes pads come in metallic, organic and semi-metallic materials with different advantages, and that certain pad and rotor material combinations have compatibility issues.
Broadly, organic and resin pads run quieter with good initial bite, while metallic and sintered pads suit demanding, high-temperature and wet conditions and can be noisier. SRAM adds that changing compound means replacing the rotors too, since a new compound on a used rotor can create noise and reduce performance.
So do not swap compounds to chase quiet. Any pad, rotor, caliper or adapter change must be confirmed compatible with your exact bike and brake system, and the Valtinsu electric dirt bike lineup should be checked model by model before you order replacement brake components.
Hydraulic Brake Warning
|
Do not guess the fluid Different hydraulic brake systems use different fluids. Some use mineral oil, others use DOT fluid, and they are not interchangeable. Using the wrong fluid can damage seals and compromise the brake. This article will not tell you which fluid your bike uses, because that is not something to infer. Get it from your model-specific manual or from the brake-component manufacturer. Do not open the hydraulic system without the correct service information, tools and experience. Brake fluid is also a contaminant: it will ruin pads it touches. |
Model Context Does Not Set Brake Specifications
Valtinsu’s current model pages identify each bike and its published equipment, but they do not establish a universal pad, rotor, fluid or torque specification. Use the exact product page to confirm the model, then use the model-specific manual or brake-component documentation for service limits.
For example, the Valtinsu EM-5 Pro page is useful for confirming the model being serviced; it is not evidence that another Valtinsu model uses the same brake hardware.
Do not infer brake compatibility or service limits from motor power, top speed, wheel size or suspension figures.
Valtinsu Brake Service Boundaries
Valtinsu currently lists user manuals for the EM-5, EM-5 Pro in green and black, EM-5 Ultra and EM23. Before servicing or adjusting the brakes, check the applicable Valtinsu user manuals for your exact model. The models are not identical, so guidance for one is not guidance for another.
At lineup level, Valtinsu’s collection page describes the range as using hydraulic disc brakes, and the accessories catalogue lists model-specific brake components: brake levers, front and rear brake assemblies, a front brake rotor.
|
What is not published Valtinsu does not publish a brake rotor size, rotor minimum thickness, pad compound, pad thickness or wear limit, brake caliper or brake manufacturer, brake-fluid type, brake torque specification, or a brake bed-in procedure in the available product information. If you need any of those, check the model-specific Valtinsu manual and the brake-component manufacturer’s service instructions. Do not infer a brake specification from motor power, top speed, wheel size or suspension figures. |
Valtinsu’s own guidance is worth following here: never force a component that does not align properly, and seek qualified technician assistance for unfamiliar brake work. You can browse the current Valtinsu electric dirt bikes range for model context, but brake service questions belong with the manual and support.
Bottom Line
Brake squeal has several possible causes, so there is no single fix. Moisture-related noise may clear as the brake dries; contamination can require pad replacement; incomplete bed-in needs the correct manufacturer procedure; alignment, wear and compatibility decisions require specifications for the exact brake system.
Start with the lowest-risk check and let braking performance—not noise alone—determine whether the bike should be ridden. Use the exact manual or component documentation for wear limits, torque values, fluid type and service procedures.
FAQs
Why are my electric dirt bike brakes squeaking?
Brake squeal is a symptom, not one diagnosis. Common causes include:
- Water or fine dirt temporarily reaching the rotor
- Oil, grease, chain lube or brake-fluid contamination
- Glazed or incompletely bedded pads
- Caliper misalignment, rotor rub, wear or component damage
Judge the brake by stopping power, lever feel and consistency—not noise alone.
Is brake squeal after rain or washing safe?
Usually, but only when braking power and lever feel remain normal and the noise fades as the brake dries. Stop riding and inspect if the noise persists or appears with weak braking, grinding, severe vibration, abnormal lever travel or fluid leakage.
How can I tell squeal, cyclic rub and grinding apart?
Use the timing and texture of the sound:
- Squeal mainly while braking points toward the pad-and-rotor friction surfaces.
- A sound that repeats once per wheel revolution points toward rotor rub, wheel seating or alignment.
- Grinding or metallic scraping can indicate missing friction material or rotor damage; stop riding.
Do new brake pads or rotors need bed-in?
Yes. New pads or rotors generally need the bed-in procedure specified by the brake manufacturer so pad material transfers evenly and braking becomes consistent. Do not borrow stop counts, speeds or cooling instructions from a different brake system; use the applicable manual.
Can I use household cleaners or general-purpose degreaser on brake parts?
No. Do not use WD-40, chain lubricant, silicone spray, polish, oily degreaser or any product that leaves residue on the rotor or pads. Use only a cleaning method approved for the brake system, and avoid touching the friction surfaces afterward.
When should I replace brake pads or a rotor instead of cleaning them?
Replace parts when cleaning cannot correct the underlying condition or a service limit has been reached. Common replacement triggers include:
- Pads contaminated with oil or brake fluid, cracked, crumbling, heat-damaged or below the manufacturer wear limit
- A rotor that is cracked, severely warped, deeply scored, badly corroded or below its manufacturer minimum thickness
- Backing-plate contact, grinding or visible structural damage
- A combination the brake manufacturer specifies must be replaced as a matched set
Sources
- Valtinsu, User Manuals. Date not stated. Retrieved 11 Aug 2026. Used for: the manuals listed for EM-5, EM-5 Pro green and black, EM-5 Ultra and EM23, and their role as the authority for model-specific brake service.
- Valtinsu, Electric Dirt Bike Collection. Date not stated. Retrieved 11 Aug 2026. Used for: the lineup-level statement that the range uses hydraulic disc brakes, and model comparison context.
- Valtinsu, EM-5 Pro Black Product Page. Used for: current model identification only; not used to infer shared brake hardware, compatibility or service limits.
- Valtinsu, Parts and Accessories. Date not stated. Retrieved 11 Aug 2026. Used for: model-specific brake components listed, and the guidance not to force components and to seek qualified assistance for unfamiliar brake work.
- SRAM, Why are my SRAM road disc brakes noisy?. Date not stated. Retrieved 11 Aug 2026. Used for: disc brake noise can be water or dirt temporarily on the rotors; clean rotors with isopropyl alcohol or mild soap and water; persistent long-term noise points to contaminated pads or improper bed-in, with replacement of pads and rotors plus careful bed-in as the stated solution.
- SRAM, What is the bed-in procedure for SRAM brakes?. Date not stated. Retrieved 11 Aug 2026. Used for: the purpose of bed-in is to increase friction by evenly distributing pad material onto the rotor, and new pads and rotors must be bedded in before reaching full braking potential. The procedure itself is published in SRAM’s own manual and is not reproduced here.
- SRAM, Disc Brake Rotor Overview. Date not stated. Retrieved 11 Aug 2026. Used for: avoid touching the braking surface of pad or rotor because oil from hands contaminates them; bed-in is critical for consistent performance and minimal noise; when changing pad compound the rotors should be replaced too, since a new compound on a used rotor can create noise and reduce performance.
- SRAM, Brake Maintenance Guide. Date not stated. Retrieved 11 Aug 2026. Used for: contaminated pads must be replaced; bed-in must be repeated whenever new pads or rotors are installed, with reduced power and increased noise if skipped.
- SRAM, Brake Pad Overview. Date not stated. Referenced 11 Aug 2026 for pad compound context only. Claims attributed in this article are those confirmed on the SRAM rotor overview and brake maintenance pages.
- Park Tool Co., Disc Brake Pad Removal and Installation. Published 1 Apr 2022. Retrieved 11 Aug 2026. Used for: brake fluids, oils and grease can ruin pads and are not always visible; contaminated pads may cause squeal, extra lever effort, and a darkness on rotor and pads that smears when rubbed with a finger; common sources include aerosol lubricant overspray and hydraulic-system leaks; pads come in metallic, organic and semi-metallic materials with possible pad and rotor compatibility issues; check manufacturer-specific wear specifications.
- Park Tool Co., Disc Brake Squeal: A Case Study. Published 9 June 2011. Retrieved 11 Aug 2026. Used for: a documented case in which pads contaminated with oil could not be restored to normal function by any product.
- Park Tool Co., Hydraulic Disc Brake Alignment. Date not stated. Retrieved 11 Aug 2026. Used for: pad and rotor rub as a symptom of caliper misalignment, and the need to confirm the wheel is properly seated before judging alignment.
- Park Tool Co., Disc Brake Rotor Removal and Installation. Published 31 May 2018. Retrieved 11 Aug 2026. Used for: rotor wear and damage assessment, handling rotors without touching braking surfaces, and the instruction not to oil rotor bolts because oil can migrate outward under braking heat.


Looking for something else?

Electric Dirt Bike Replacement Parts Availability: What Buyers Should Verify Before Ordering
LEARN MORE
How to Check an Electric Dirt Bike for Safety Recalls by Model and Serial Number
LEARN MORE
How to Choose an Electric Dirt Bike Repair Shop: Questions to Ask Before Service
LEARN MORE
How to Lift a Fallen Electric Dirt Bike Without Hurting Yourself or the Bike
LEARN MORELooking for something else?

Electric Dirt Bike Fall Riding on Wet Leaves: Grip, Hidden Obstacles and Braking
LEARN MORE
Electric Dirt Bike Trailside Power Loss: Recovery Plan When the Battery Is Dead
LEARN MORE